Reticle
The reticle acts as both a cursor and targeting crosshair. If you have the Profiler subroutine installed, additional information will be displayed indicating what a character's identity is, its health, armor, and any subroutines and/or permissions it's carrying.
There are several different states the reticle can be in.
|
Normal |
The base function of the reticle acts as a targeting crosshair. |
|
Activate |
When the reticle passes over items or characters you can interact with, the symbol will change to inform you of interactivity, and a description of the object and/or what actions can be taken will appear below the reticle. If this activity includes energy transfer, the transfer bar will appear. Use the action key to activate or interact (default of F). |
|
Innocent |
When the reticle passes over an innocent character, the symbol changes to a solid circle. This informs you not to attack that character. De-rezzing an innocent program causes an Illegal Program Termination (i.e. you lose the game and have to reload). |
|
Permission Ring |
When the reticle passes over an interactive object that requires Permissions, the ring circling the crosshair will indicate which ones are necessary to activate that object. Permissions you have are light blue, ones you don't have (but aren't needed) are dark blue, and ones still needed are in red. At the bottom of the screen — between the Energy and Health bars — is a smaller version of the permission ring that shows which permissions you have, at all times. Again, light blue means you have that permission, dark blue means you don't. Permissions are the |
Health and Energy Caches
At the bottom center of the screen, are the Energy meter on the left in green, the Health meter on the right in Red, and the Permission Ring in the middle.
The green bar indicates how much energy you have remaining in Jet's Energy Cache, that is used for subroutines, to fire weapons, and sometimes activate or acquire items. If the Energy meter drops to zero, then you will no longer be able to fire any weapons except the Disc Primitive, or do many tasks. The red bar indicates how much energy you have remaining in Jet's Health Cache, and represents Jet's hit points or life force. If the Health meter drops to zero, you will then de-rezz (die). See above, for more information about the Permission Ring.
Both caches start at 100 units. As you progress through the game and upgrade your Performance Ratings, you can raise the amount of health and energy that may be stored in these caches.
Patch Routines
 Health/Energy Patches |
There are three types of patch routines. Holding the action key (default of F) while standing next to a patch, will start the download.
|
Core Dumps
|
|
When you de-rezz most hostile programs, they leave behind their health, energy, any permissions, and any subroutines, in the form of a Core Dump. |
Be certain to download Core Dumps as soon as possible. After a while, they will fade and then disappear. The longer you wait, the less health and energy they will contain. Eventually, any subroutines or permissions contained in the Core Dump will dissipate as well.
Archive Bins
|
Often you will find Archive Bins, which contain downloadable item nodes (small colored cubes) such as Permissions, Subroutines, E-Mails, and Videos.
|
If no item nodes are present, then the Archive Bin is empty. Permissions are usually required to access bins. Placing the reticle over a bin, will show you which permissions are needed. If you have the proper permissions, press the action key (default of F) to access it. An interactive menu (see below) will appear on the lower left side of the screen, listing the bin's contents.
To download, simply press the number key associated with the item you wish to acquire, and wait for the download to complete. More than one item can be downloaded at the same time. Transfer speed is affected by Jet's Performance Ratings. All item nodes require varying amounts of energy to download. The menu will indicate how much energy is required to download each item.
Interactive Menus
|
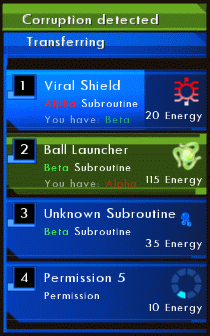
Whenever you download items, or are required to make a choice in a conversation with another program, a menu will appear in the lower left corner of the screen. These menus always numerically list the choices you can make. Pressing the number that corresponds with each item, will then choose that item. (e.g. Pressing the 1 key has started downloading the Viral Shield subroutine, as shown in the picture. A faint blue transfer bar showing the download progress appears in the background.) If you realize that you've made a mistake, and don't want to waste time and energy downloading an item you don't need — just hit the Esc key to cancel the download. The image shown on the left is representative of what you'll see if you access a Core Dump or Archive Bin. It will list any subroutines and/or permissions, whether you already have the subroutines, and what state they are in. The image shows that one subroutine is Infected or Corrupt (it has a green background), and another one is Unknown. You will only know which subroutines are corrupt if you have the Virus Scan subroutine installed, and it has been optimized to Beta level. The menu will also indicate how much energy is required to download each item. If you don't have enough energy to download an item, you'll receive a warning that you have "Insufficient Energy". Remember that it's possible to download more than one item at the same time, and transfer speed is dependent on Jet's Performance Ratings. If you begin a conversation with a character that requires a choice to be made, the menu will look similar — but instead it will simply consist of dialog choices. |
Defense Indicator
|
|
This indicator appears in the lower right corner of the screen. The figure represents Jet's body, and what Defense Subroutine "armor" pieces he is wearing. Several subroutines must be installed in Jet's System Memory screen, in order to protect his entire body. If the Viral Shield subroutine is installed, a bright outline will appear around the figure. If any of the defense subroutines become corrupt, each armor piece that is infected will turn green. If the Viral Shield subroutine becomes infected, the outline will also turn green. |
Transfer Bar
|
|
Whenever an interactive object requires an energy transfer to activate, a Transfer Bar will appear as part of the Reticle. The Transfer Bar indicates the time it will take to complete the transfer. And if you look carefully, you will notice a small "flag" appear on the Energy bar at the bottom of the screen, which shows how much energy will be used. A numerical representation of the energy required will also be displayed, below the reticle. Press and hold the action key (default of F) to transfer energy from Jet to the object. If you do not have enough energy to complete the transfer, an "Insufficient Energy" warning will be shown. |
Notifications
Periodically, as Jet progresses through the game, he will receive notification alerts. They will be displayed toward the upper left corner of the screen. These icons let you know when new information has been received, if someone wants to contact you, or whether you have reached a new version milestone.
Most Notifications disappear after a short time, so it's important to pay attention, or else you may forget about them later.
|
Task Update |
Whenever a new objective is added or an existing objective is completed, this icon will appear. Press the Status Display key (default of Tab) to view the update, and clear the notification. Build Points are earned for completing tasks and collecting Build Notes. |
|
New Subroutine |
This icon appears when you have acquired a new subroutine. If an earlier version of the subroutine is not already installed and you want to use it, press the F1 key to visit the System Memory screen and proceed with the installation. |
|
Version Upgrade |
Each time you earn 100 Build Points, your major version number will increase by one (e.g. v1.0.0 to 2.0.0). This icon will appear to inform you, so you can visit the System Memory screen and spend another set of points given that are meant to improve your Performance Ratings. |
|
Help File |
When you receive a new Help File, this icon will appear. Press the Help Files key (default of 8) to read the latest one, or access a list that displays them all. |
|
Ping Signal |
When another character not in your area wants to communicate with you, a "Call Signal" with that character's portrait will be displayed. You will need to find the nearest I/O Node (see below) and activate it using the action key (default of F), in order to converse. |
I/O Nodes

|
An I/O Node represents a way for remote characters to converse with you. When a character wants to talk this way, a "Call Signal" ping is sent to inform you of the waiting conversation. The signal indicator will show a portrait of the character sending the ping. To complete the connection and start the conversation, you must find an active I/O Node and press the action key (default of F) while standing next to it. |
Conversation Icon
|
|
If a nearby character has something to say to you, this icon will appear above that program's head. Approach the program and hit the action key (default of F) to begin talking. |
Version Number and Weapon/Subroutine Indicators
 Version Number |
Jet starts with a version number of v0.0.0 at the start of the game. Completing mission tasks will give you Build Points which increase this version number. After collecting 100 Build Points, the first digit in your version will increase (e.g. v1.0.0) to indicate that you have reached a new milestone. This allows you to improve your Performance Ratings. Throughout the game, you can earn more Build Points by finding Build Notes. There is a counter below your version number, that lets you know how many are left to find on each level. If you manage to complete |
||||||||||||
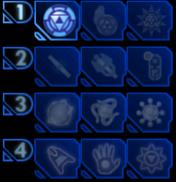 Weapon Selection |
These indicators display which weapon subroutines are installed, and which weapon is currently selected. The weapons are broken down into four categories, for easy reference and selection. Pressing keys 1-4 will select a weapon category. Repeatedly pressing the same number will cycle through forms of the weapon in that category, if subroutines that modify the base form are installed. If a subroutine becomes infected, its icon will turn green. Below are the four different weapon categories, and the order in which weapons are selected.
|
||||||||||||
 Active Subroutines |
Below the weapon icon indicators, you will also see any currently installed utility subroutines as icons. If a subroutine is infected, it will turn green. Holding down the Status Display key (default of Tab) will show descriptions for each icon displayed. |
Build Notes
|
|
Build Notes are "secret" level items that are typically hidden and hard to find. They are placed on each level in a semi-random fashion each time you play, so they won't always be in the same locations. These notes allow you to collect additional Build Points to improve your score, and increase your Performance Ratings faster. To pick up a Build Note, move next to it and press the action key (default of F). A counter near the top left of the screen shows how many you have, and how many there are total, for the current level. There is also a counter on the inner ring of the System Memory screen, that displays the number of Build Notes you have found out of all 100 spread throughout the levels in the game. |
Code Optimization Ware (C.O.W.)
See the 5.4 System Memory section for information on Optimizers.